I love Pinterest.
I need to organize my jewelry.
Combine creative people with Pinterest and my jewelry gets an organized space!
I have wanted to do this project for about a year now and just kept putting it off. The last few days I have been scrolling through Pinterest trying to find an idea that would sell me enough that I would get off my butt and do it. Today, I went to Home Depot and finished this in less than an hour. Gosh, why did I wait so long?
I love the way this organized space turned out. In fact, I am down right giddy about it. I've caught myself just staring at it. It's so awesome.
A few reasons why I love this so much:
1.) I have seen these sell for $90 to $100. I made this for $ 28!!!!!! That alone is enough to be stoked.
2.) I am an organizing junkie. If there is a project that let's me organize something then let me do it!
3.) I can SEE all my jewelry. I am ashamed to even tell you how I stored my jewelry especially after professing my love of organization. Sigh... Ziploc bags and a cheap $9 drawer thingy that I got when I was about 17. I could never find what I wanted and it was a mess. I have gotten in a habit of not even looking at my jewelry and the majority of the time, I would skip wearing anything.
4.) When I was little my dad bought me jewelry and taught me to take care of it. He loved buying me jewelry and I have some amazing pieces thanks to him. I hope to be able to wear more of the pieces now that it is organized and easier to find.
So, here's how I made my jewelry organizer.
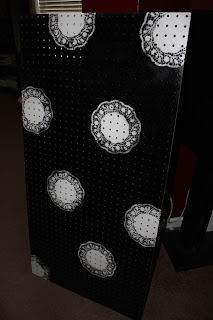
First, I went to Home Depot and bought a 2x4 white pegboard. I decided I wanted to paint it. I already had several colors of spray paint at home. Then, I decided I wanted to add some type of decoration. Immediately I thought of some doilies I had purchased for a craft a few months back. So, I taped them on the pegboard. I decided on using black spray paint and sprayed the board. It took ten minutes to dry.
I like the way this came out. I wanted a bit of contrast and I think I got that!
I decided on where I wanted it and hung it up with a shelf I already had (I did spray paint the shelf b/c it was a dark chocolate color.)
After it was straight and tightly anchored into the wall the fun began. My daughter and I got all the jewelry out & organized it on the ground. We grouped it together so it would be easier to hang it all up. We went around the house & looked in my purse for any jewelry that we didn't have. We also gathered up all her jewelry from her room. This also allowed for us to declutter any old, broken or missing pieces.
It took about 20 minutes to organize it all and hang it up.
Done! I love it!
Like I mentioned before, this only cost me $28 bucks! The pegboard was $8.95. I bought a brackets set that cost $7.99. The bracket set only came with one long necklace hook so I bought 3 individual ones to give me four total. They are the brackets in the first two rows. Three of them hold necklaces while the one on the left holds dangled earrings. The individual necklace brackets (BTW- I don't know the technical term for those things.) sot $2.78 each. Then I went to the Dollar store and bought a small, black tray with dividers. You can't see it well b/c it blends in so well with the shelf, but it's there holding some random pieces needed for my watch and backs to some earrings and charms. That cost a dollar. I had the paint, doilies and shelf.
Have I mentioned that I LOVE, LOVE, LOVE this project?!
Until next time,
Reb


